1. Creating a branch
It quite often happens that a software product is on a git server and developers add new features to the product. To make the job easier, developers usually create branches beside the master branch (which is the default branch) and work on their branch and once the changes are confirmed and tested, they will be merged into the master branch.
1.2 Creating a local branch
Creates a new branch, but leaves you on the same branch:
|
1 |
git branch <branch_name> |
Creates a new branch and checks out the new branch:
|
1 |
git checkout -b <branch_name> |
In fact, it does the following:
|
1 2 |
git branch <branch_name> # create a new branch git switch <branch_name> # then switch to the new branch |
If you open the HEAD file, you will see it is pointing to a branch, for instance:
|
1 |
ref: refs/heads/hotfix |
If you open the
|
1 |
.git/refs/heads |
directory, you will see a file for each one of your branches:
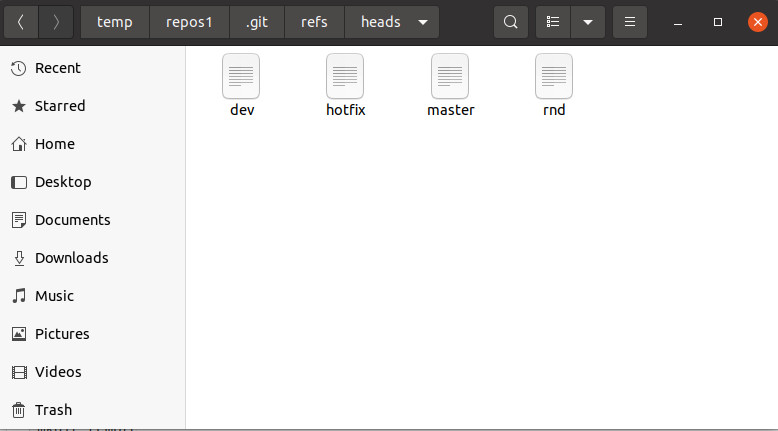
Creating a new branch is simply a matter of writing a commit hash to a new file, and that’s the reason why Git branches are so lightweight.
1.3 Creating a remote branch
First, you create your branch locally:
|
1 |
git checkout -b <branch-name> |
The remote branch is automatically created when you push it to the remote server:
|
1 2 |
git push <remote-name> <local-branch-name>:<remote-branch-name> git push <remote-name> <branch-name> |
you might want to make the relationship persistent by using:
|
1 2 3 |
git push --set-upstream <remote-name> <local-branch-name> # or short version git push -u <remote-name> <local-branch-name> |
Other people in your team can reach your branch, by doing:
|
1 2 |
git checkout remotes/origin/my-branch git checkout origin/my-branch |
if instead of:
|
1 |
git checkout <branch-name> |
you can use the following:
|
1 2 |
git fetch git checkout <branch-name> |
You will enter a detached HEAD state.
2. Checking out a branch
|
1 |
git checkout -b <new-branch-name> |
3. Switching Branches
|
1 |
git switch <existing_branch> |
or
|
1 |
git checkout <existing-branch> |
This will create a new branch
|
1 |
git switch -c <new-branch-name> |
3.1 Pull another Git branch without switching
|
1 |
git fetch <remote> <sourceBranch>:<destinationBranch> |
|
1 |
git fetch origin master:master |
4. Track a remote branch
If you have already created a local branch, and you want to track it with the remote branch you just pulled down, or want to change the upstream branch you’re tracking:
|
1 2 3 |
git branch --set-upstream-to <remote-name>/<branch name> # or short version git branch -u <remote-name>/<branch name> |
Please pay attention to the -to at the end of “–set-upstream-to”. There is a deprecated flag “–set-upstream” (without to at the end) which is no longer supported.
5. Viewing Branches
5.1 Viewing local branch
To view local branches
|
1 |
git branch |
5.2 Viewing remote branch
To see only remote branches:
|
1 |
git branch -r |
5.3 Viewing all remote/ local branch
To view both remote branches and local branches
|
1 |
git branch -a |
To view branches of a remote:
|
1 |
git remote show <remote-name> |
for instance:
|
1 2 3 |
git remote show origin #or git remote show upstream |
To see the tracked branches:
|
1 2 3 |
git branch -vv --all # or git status -sb |
6. Deleting Branches
Deleting both local and remote branch
local and remote branches actually have nothing to do with each other, even if you’ve established a tracking connection. They are completely separate objects in Git and deleting one wouldn’t delete the other If you want any branch item to be deleted, you need to delete it explicitly.
6.1 Deleting a local branch
|
1 |
git branch -d <branch-name> |
-D, which is an alias for –delete –force, which deletes the branch “irrespective of its merged status
|
1 |
git branch -D <branch-name> |
6.2 Deleting a remote branch
|
1 |
git push <remote-name> --delete <branch-name> |
As of Git v1.7.0, you can delete a remote branch using:
|
1 |
git push <remote-name> --delete <branch-name> |
summary:
|
1 2 |
$ git push -d <remote_name> <branch-name> $ git branch -d <branch_name> |
6.3 Undo/ Recover a deleted branch
First, find the SHA1 for the commit at the tip of your deleted branch:
|
1 |
$ git reflog --no-abbrev |
Then:
|
1 |
git checkout <SHA1> |
Once you’re at that commit, you will get the followings: “You are in ‘detached HEAD‘ state.” Create a new branch from there with the same name to recreate the deleted branch:
|
1 |
git checkout -b <branchname> |
Or you can do the above steps in one:
|
1 |
git checkout -b <branchname> <SHA1> |
Refs: [1]
7. Pushing into the wrong branch
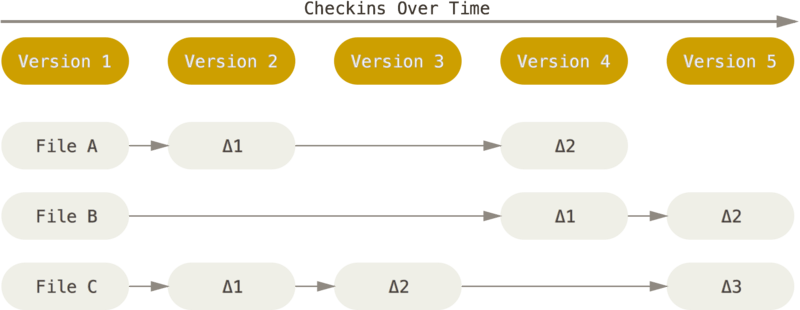
The way Git thinks about its data is what sets it apart from all other VCS (CVS, Subversion, Perforce, Bazaar, and so on). Most other systems store data in the form of a list of file-based changes. This is commonly described as delta-based version control
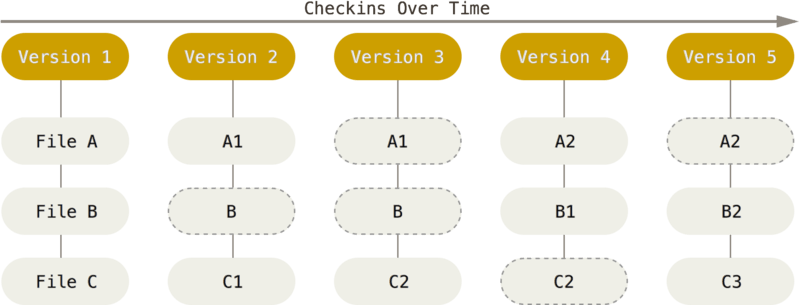
Git considers its data to be a set of snapshots of a miniature file system.
Any time you commit, or save the state of your project, Git takes a snapshot of all your files at that particular moment and stores a reference to that snapshot. To be efficient, if files have not changed, Git doesn’t store the file again, just a link to the previous identical file it has already stored.
When you make a commit, Git stores a commit object that contains a pointer to the snapshot of the content you staged. This object also contains the author’s name and email address, the message that you typed, and pointers to the commit or commits that directly came before this commit (its parent or parents):
- zero parents for the initial commit,
- one parent for a normal commit,
- multiple parents for a commit that results from a merge of two or more branches.
Let’s make an example:
|
1 2 3 4 5 6 7 |
mkdir repos3 cd repose3 git init date > README date > LICENSE date > test.rb git commit -m 'Initial commit' |
Now we have 5 objects in our repository, 3 blob , which you can see them by:
|
1 |
git rev-list --objects --all | git cat-file --batch-check='%(objectname) %(objecttype) %(rest)' | grep '^[^ ]* blob' | cut -d" " -f1,3- |
|
1 2 3 |
7b1e9e77ee408c204247f4ab0ec309500d0241d9 LICENSE 3dc1b1d21e6a4761f89e8be165033bd28eadc93f README 8571f49c9a19e051250eb62d9b47b976810df081 test.rb |
one tree that lists the contents of the directory and specifies which file names are stored as which blobs, and one commit with the pointer to that root tree and all the commit metadata.
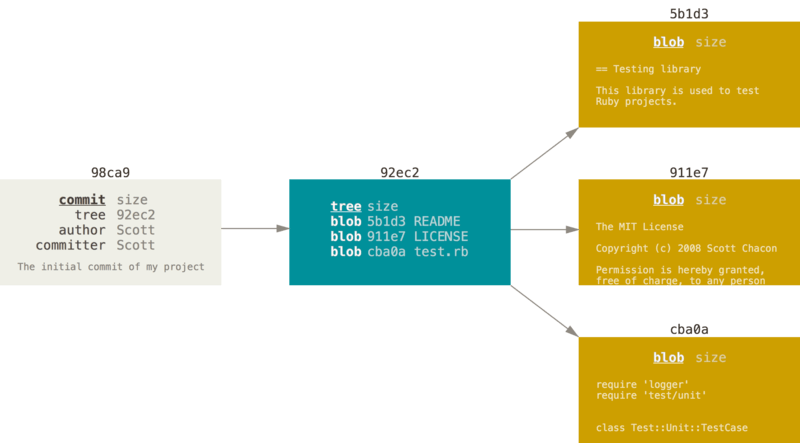
If you make some changes and commit again, the next commit stores a pointer to the commit that came immediately before it.
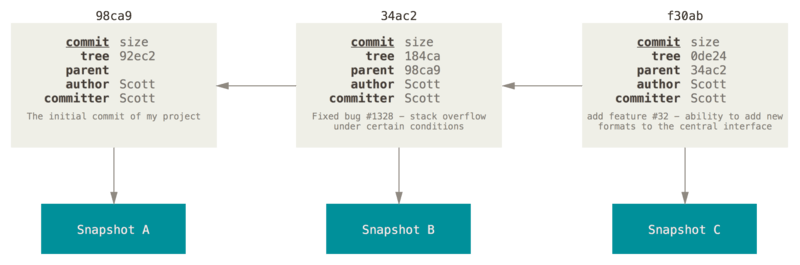
A branch in Git is simply a lightweight movable pointer to one of these commits. The default branch name in Git is master. As you start making commits, you’re given a master branch that points to the last commit you made. Every time you commit, the master branch pointer moves forward automatically.
Because a branch in Git is actually a simple file that contains the 40 character SHA-1 checksum of the commit it points to, branches are cheap to create and destroy.
How does Git know what branch you’re currently on? It keeps a special pointer called HEAD.
8. A Full Example
So let’s get started and create two branches, one for developer1 and one for developer2.
|
1 2 3 4 5 6 7 8 9 10 11 12 13 14 15 16 |
mkdir repos1 mkdir repos2 mkdir remote_repose cd repos1 git init git init --bare ../remote_repose/ git remote add origin ../remote_repose/ touch A.txt date >A.txt git add -A git commit -a -m 'A Added' git push --set-upstream origin master cd ../repos2 git clone ../remote_repose . |
|
1 2 3 4 |
cd ../repos2 git branch b2 cd ../repos1 git branch b1 |
let’s make some work on the first branches:
|
1 2 3 4 5 6 7 8 9 10 11 |
cd ../repos1 git checkout b1 touch B.txt git add -A git commit -a -m 'B.txt Added in branch b1' git push --set-upstream origin b1 date > A.txt git add -A git commit -a -m 'A.txt updated in branch b1' git push --set-upstream origin b1 |
and some changes in the second branch:
|
1 2 3 4 5 6 7 8 9 10 11 12 |
cd ../repos2 git checkout b2 touch C.txt git add -A git commit -a -m 'C.txt Added in branch b2' git push --set-upstream origin b2 date > A.txt git add -A git commit -a -m 'A.txt updated in branch b2' git push --set-upstream origin b2 git pull |
now you should see this in git gui or if you go to Repositories> Visualize all Branch History or
|
1 2 3 |
gitk --all # or you can see in the terminal: git log --all --decorate --graph --oneline |
You can add the later as an alias so you dont’t have to type it everytime:
|
1 2 |
git config --global alias.graph 'log --all --decorate --graph --oneline' git graph |
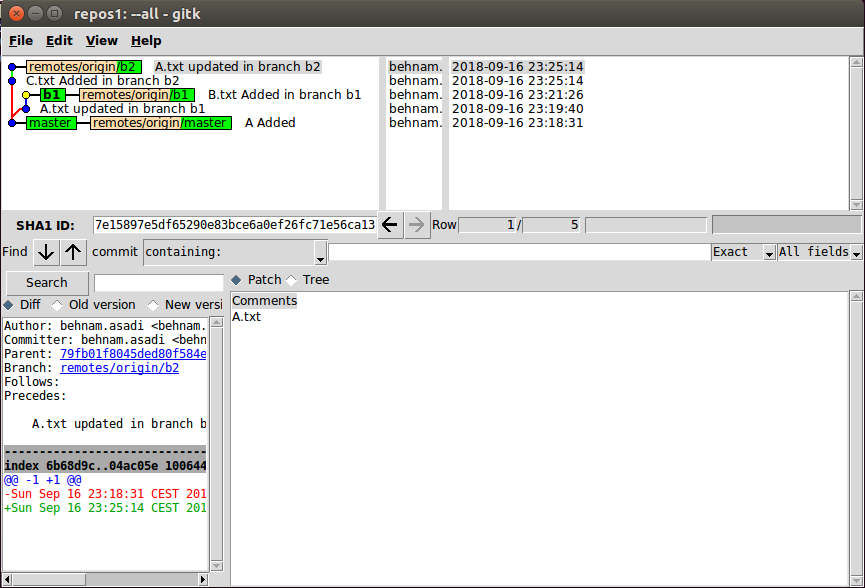

Now in the git gui, go to merge>local merge and choose b1, you will get the following error because of the merge conflict:
so, call the following to solve the conflict:
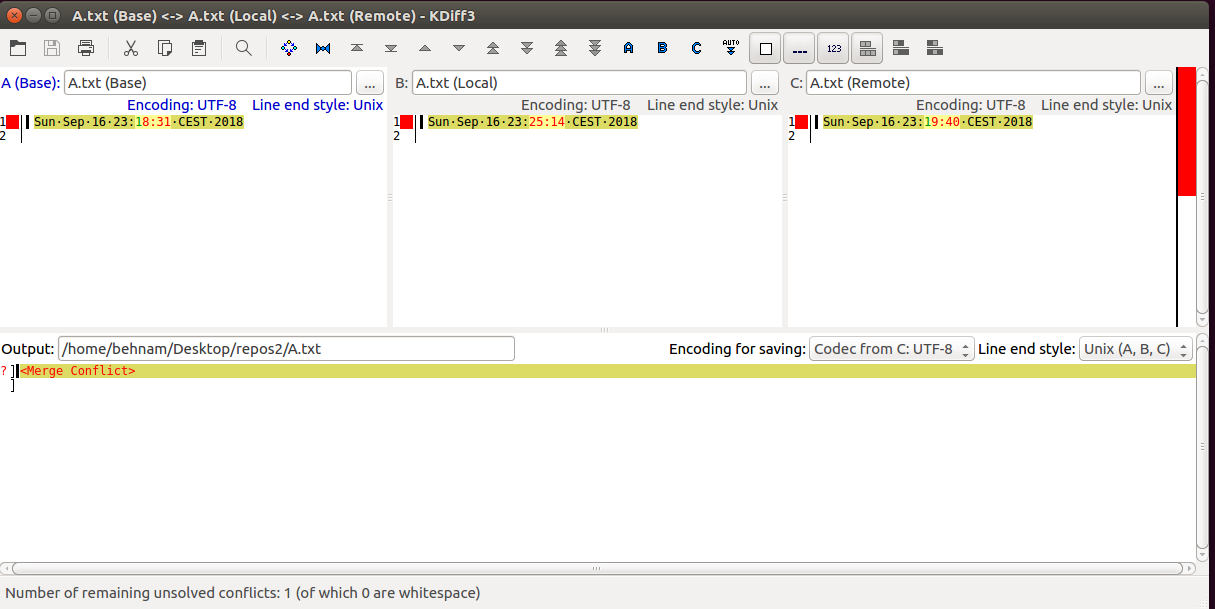
choose C and save and then:
|
1 2 3 |
git clean -i git commit -m 'branch b1 merged into b2' git push |
Interactive git merge visualizer
Refs: [1]
git worktree
If you are to check out more than one branch at a time, you can use git worktree.
|
1 2 3 |
git worktree add ../wt/master master git worktree add ../wt/f-c feature-c git worktree list |
git tag
To create a new tag:
|
1 |
git tag <tagname> |
For example, to create a tag called “v1.0”, run the command
|
1 |
git tag v1.0 |
Note: By default, the tag is created at the current HEAD (the latest commit on the current branch).
To list all existing tags, run the following command:
|
1 |
git tag |
This will show a list of all tags in alphabetical order.
To checkout (switch to) a specific tag, run the following command:
|
1 |
git checkout <tagname> |
For example, to checkout the “v1.0” tag, run the command
|
1 |
git checkout v1.0 |
Note: Checking out a tag will put you in a “detached HEAD” state, which means that you are no longer on a branch.
Annotated tags are tags that contain additional information such as a tag message and the tagger’s name and email address.
To create an annotated tag, run the following command:
|
1 |
git tag -a <tagname> -m <tag message> |
For example, to create an annotated tag called “v1.0” with the message “Initial release”, run the command
|
1 |
git tag -a v1.0 -m "Initial release" |
To push tags to a remote repository, run the following command:
|
1 |
git push origin <tagname> |
For example, to push the “v1.0” tag to the remote repository, run the command
|
1 |
git push origin v1.0 |
Note: If you want to push all tags to the remote repository, run the command
|
1 |
git push --tags |
To delete a tag, run the following command:
|
1 |
git tag -d <tagname> |
For example, to delete the “v1.0” tag, run the command
|
1 |
git tag -d v1.0 |
Note: This only deletes the tag locally. If you want to delete a tag on the remote repository, run the command
|
1 |
git push --delete origin <tagname> |
Delete removed/ gone branches
|
1 2 3 |
git fetch --all git fetch --prune git branch -v|grep \\[gone\\]|awk '{print $1}'|xargs -I{} git branch -D {} |
1. git branch -v:
– This command lists all local branches along with their last commit and the upstream branch if any.
– The -v (or --verbose ) flag makes sure that the commit information is shown along with the branch name.
2. grep \[gone\] :
– This command filters the output of the previous command to only include lines that have [gone]. The [gone] tag appears next to branches that are still locally available but their corresponding remote branches have been deleted.
– The backslashes (\) before the square brackets are used to escape them, as square brackets have special meanings in regex (they define character sets), and here we want to treat them as literal characters.
3. awk '{print $1}':
– awk processes the filtered list and this particular command tells awk to print the first field of each line, which in the output of git branch -v is the branch name.
– Fields in awk are by default separated by spaces, so $1 refers to the first word in each line, which is the branch name.
4. xargs -I{} git branch -D {}:
– xargs takes the list of branch names produced by awk and passes them as arguments to another command.
– -I{} is an option in xargs that defines a placeholder {} which can be used in the subsequent command to represent each item passed to xargs.
– git branch -D {} uses the placeholder to delete each branch. The -D option forcefully deletes each specified branch without checking if it has been merged into the currently checked out branch.
